Loadrunner AJAX TrueClient Protocol
AJAX Truclient Protocol is a major protocol introduced in Load Runner from Version 11.0. This is a new protocol which could be very well used as an alternative for recording Web Applications, especially in applications where AJAX request is widely used.
Pre-requisites for Scripting in AJAX Truclient Protocol:
AJAX Truclient Protocol Integrates with Mozilla Firefox for Script Development and hence the most
important thing is that the Application should be supported in Mozilla Firefox.
Supported Mozilla Firefox Version up to LR 12.0
This Limitation is applicable only for Versions Load Runner 11.00 -- Load Runner 11.04
From LoadRunner 11.50, AJAX Truclient Integrates with Internet Explorer also which will be very helpful for the recording Web Applications.
1. Script Development:
1.1 How to Start Recording Using AJAX Truclient Protocol?
Recording Business process using AJAX Truclient Protocol is very much easier when compared to the other protocols such as WEB (Http/Html), Citrix, Winsock etc.
AJAX Truclient Integrates with Mozilla Firefox for Script recording. There is no need to install Mozilla Firefox separately since it is embedded internally within LoadRunner.
Also Recording in AJAX Truclient is also different from other protocols. Please follow the given below steps for Script Recording.
Steps to Record Script using AJAX Truclient Protocol:
Launch VuGEN -> Click New -> Select AJAX Truclient Single Protocol -> Click Develop Scriptas shown below on

On Clicking Develop script, VuGEN will take you to the Interactive mode of script recording where you can see the Mozilla Firefox window along with the LoadRunner VuGEN for Truclient.
In the LoadRunner VuGEN for Truclient, Click Record and Just manually browse your business process through Mozilla Firefox and script will be generated on the VuGEN side .
Sample Script for your reference:

Since it is a UI based scripting, one can easily interpret the script to find out the Business process
recorded, which is bit complex using Web (Http/Html) protocol.
1.2 Different methods of Parameterization in AJAX Truclient Protocol
Method 1:
Step 1: Create parameter list

Step 2: After recording, edit the ‘Arguments’ section

Replay Log:

Method 2:
1. Open the ‘JavaScript Arguments Editor’, right click, and choose Replace with a Parameter option


2. Provide the ‘Parameter Name’


Method 3: Parameterize Data’s with Comma’s:

In a Web script, a string (input) containing commas, can be separately parameterized by having two
parameterized values viz., Param 1 and Param1. If you try to parameterize the complete string, you will end up in getting the ‘Failed to read….’ error as shown.


However, the same option to keep 2 different parameterized values didn't work out in AJAX TruClient Protocol script.


The following ‘File format’ option can be used in both protocols. Change the ‘Column delimiter’ from ‘Comma’ to Tab’

1.3 How to Add Think Time in AJAX Truclient Protocol?
From Tools Box, please select Wait function.
Step 1: Drag and drop ‘Wait’ from the tool box to the scripting pane.

Script would appear as, -[ wait 3 seconds ]
Step 2: Modify the ‘Arguments’ section.

In this, Math.floor () method rounds a number DOWNWARDS to its nearest integer. (Eg. The output of code ’Math.floor (1.8);‘ is 1). Hence 11 is used as a multiplication factor so that an integer in the upper decimals of 10 will be rounded to 10.
Math.random() method returns a random number between 0 and 1.
Replay Log:

1.4 Selecting a Particular Drop down Value from the list
Step 1: Record the script for the drop down combo values

Step 2: Once recorded, click the icon as the shown

Step 3: Select the 2nd option and click ‘Back’

The script would appear as,

In order to have desired value, modify the ‘Ordinal’

1.5 How to Comment a particular step in AJAX Truclient?
After recording a script, if you don’t want the script to fail due to some Insignificant/Non-Critical steps, you can easily comment out those steps just by clicking the Optional Step button as shown below.

During Execution, Optional steps will not be skipped, its only that the particular Optional step
Success/Failure will not have any impact on your scripts success.
So far, we have seen the Basics of AJAX Truclient Scripting which includes the How to Start Recording, Adding Transaction Names, Various Methods of Parameterization, Think Time Inclusion, Selecting a required value from a drop down list and making a step as Optional so that it will not have any impact on the success/ Failure of the scripts.
Now, we will see how to enhance the scripts with Validation of Scripts , Using Regular Expressions in Scripts, How to capture Texts and using Hyperlinks , Selecting of Drop down values randomly and also using X-path etc
2. SCRIPT ENHANCEMENT
2.1 How to add Verification to validate a Particular Business Process
2.1.1 Verification Check for a Static Text
Step 1: Drag and drop the ‘Verify’ in the scripting page.

Step 2: Click on the highlighted text as shown

Step 3: Choose the object from the application

Before selection After selection

Script would appear as,

Step 4: Add the following sequentially

The script would appear as,

2.1.2 Verification Check for a Dynamically Changing Text
Now I hope it will be clear for you that how a Verification function is working in AJAX Truclient . In the previous example, we are simply capturing a Static text in the Application.
But what would you do if there is a dynamically changing values i.e lets say the User Login name ?
Please follow the below steps for the same:

Assume that, after logging to the application, you need to check whether the user is logged in or not.
Step 1: Create a parameter ‘uName’ as shown below.

Step 2: Drag and drop the ‘Verify’ option from tool box to the interactive script window.

Step 3: Choose the object from the application.

The script will look like,

Step 4: Drag & drop ‘Verify’ from the tool box to the script window.

Step 5: Add the code

Step 6: Now go to ‘Verify’ section and modify the value as shown. Here ‘Name’ is a parameter containing ‘Palanisamy’ and +”” denotes any value after the parameter.

Step 7: Execute the script and see the result and replay log. The ‘tick’ mark denotes the step is successful.

Replay log:

To cross verify,
Step 8: Add any value to the parameter.

Step 9: Execute the script and see the result and replay log.


2.1.3 Verification Check for Search Results
In our Application , Search is an important Business process and hence it is highly important to validate for results.

Assume that, you are searching a record or clicking a link. It is returning ‘No data’ as the above. In such cases, if this kind of messages has to be captured and displayed in the ‘Replay Log’, then follow the given steps.
Step 1: Drag & drop the ‘Verify’ from the tool box

The script will have,

Step 2: Choose the object which is showing ‘0’ records. In the below snapshot, it is indicated in green
color

The script will have,

Step 3: Expand the step and select ‘Does not contain’

Step 4: Select the condition as ‘Not Contain’

Step 5: Drag and drop ‘Catch Error’ and ‘Comment’ from the toolbox

The script will look like,

Step 6: Run the script. The result and replay log would be,

2.1.4 Using IF- Else for Validation Results
Step 1: Drag and drop the ‘Verify’ from the tool box and choose the text from the application

The script will look like,

Step 2:Open the ‘JavaScript Arguments Editor’

Step 3: Declare and initialize a variable for the text as shown

Step 4: Drag and drop ‘Catch Error’ from the tool box

Step 5: Open the editor, initialize the variable

Step 6: Drag and drop ‘If block’ from the tool box

Step 7: Add the condition

2.2 Random Selection of Values
2.2.1 Random Selection of Drop down values

Step 1: Record the step for drop down combo selection.

Step 2: Double click the ‘Display the alternative steps’ icon as shown.

Alternative steps are shown below.

Step 3: Select the 2nd step and expand.

The ‘Ordinal’ value can be seen from the below snapshot.

Step: 4 Change the value to ‘0’ and replay the script to see the random selection.

2.2.2. Random Selection of Radio Buttons
Step: 1 Record the step for selecting the radio buttons.

Step: 2. Select the 1st step and expand it.

The 3 ID Methods are displayed.

The 3 ID Methods have the following information for the 3 Radio Buttons.
Automatic:
- //input[@type="radio" and @value="187309"]
- //input[@type="radio" and @value="187317"]
- //input[@type="radio" and @value="187325"]
X Path Values:
- //div[@id="radioContentWrapper"]/input[1]
- //div[@id="radioContentWrapper"]/input[2]
- //div[@id="radioContentWrapper"]/input[3]
JavaScript:
- evalXPath("//input[@type=\"radio\" and @value=\"187309\"]");
- evalXPath("//input[@type=\"radio\" and @value=\"187317\"]");
- evalXPath("//input[@type=\"radio\" and @value=\"187325\"]");
Steps 3:Consider the JavaScript method of 1st Radio Button.Paste the XPath value into the evalXPath step (within the quotes) so it now looks like this:
- evalXPath("//div[@id="radioContentWrapper"]/input[1]");
Step 4: Escape the quotes (“) in the XPath expression by preceding them with a backslash (\) so this now looks like this:
- evalXPath("//div[@id=\"radioContentWrapper\"]/input[1]");
Step 5: To get all the radio buttons we remove the ordinal ([1]) so we now get:
- evalXPath("//div[@id=\"radioContentWrapper\"]/input");
Step 6: Assign this expression to a variable called options (any variable name can be used) that will become an array containing all the elements matching the XPath we defined:
- var options=evalXPath("//div[@id=\"radioContentWrapper\"]/input");
Step 7: To randomly select the radio buttons, add the below expression.
- random(options);

Step 8: Use ‘Highlight’ option to test whether the radio buttons are selected randomly.

Results are shown after clicking on the ‘Highlight’ button.

Step 9: Run the script by commenting the other 2 radio buttons and see the results.
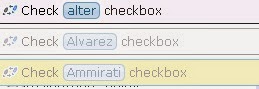
2.2.3 Random Selection of Check Boxes
Step 1: Record the check boxes selection as shown.

Step 2: Consider the 1st check box and comment the other tow as shown.
Step 3: Expand the step.

The 3 ID Methods have the following information for the 3 check boxes
Automatic:
- //input[@type="checkbox" and @value="257032"]
- //input[@type="checkbox" and @value="255664"]
- //input[@type="checkbox" and @value="246546"]
XPath:
- //tbody[@id="resultBody"]/tr[5]/td[1]/input
- //tbody[@id="resultBody"]/tr[6]/td[1]/input
- //tbody[@id="resultBody"]/tr[7]/td[1]/input
JavaScript:
- evalXPath("//input[@type=\"checkbox\" and @value=\"257032\"]");
- evalXPath("//input[@type=\"checkbox\" and @value=\"255664\"]");
- evalXPath("//input[@type=\"checkbox\" and @value=\"257032\"]");
Step 4: Consider the JavaScript method of 1st check box .Paste the XPath value into the evalXPath step (within the quotes) so it now looks like this:
- evalXPath("//tbody[@id="resultBody"]/tr[5]/td[1]/input");
Step 5: Escape the quotes (“) in the XPath expression by preceding them with a backslash (\) so this now looks like this:
- evalXPath("//tbody[@id=\"resultBody\"]/tr[5]/td[1]/input");
Step 6: To get all the check boxes we remove the ordinal ([1]) so we now get:
- evalXPath("//tbody[@id=\"resultBody\"]/tr/td[1]/input");
Step 7: Assign this expression to a variable called options (any variable name can be used) that will become an array containing all the elements matching the XPath we defined:
- var options= evalXPath("//tbody[@id=\"resultBody\"]/tr/td[1]/input");
Step 8:To randomly select the check boxes, add the below expression.
- random(options);
The final JavaScript should look like,

Step 9: Run the script and see the results.
2.2.4 Random Selection of Links based on Input Parameters
Step 1: Record the steps. In this case, 3 links have been recorded and it is shown below.

Step 2: Create a parameterized list and add the links in it.

Step 3: Consider the 1st link and comment out the other two links as shown.

Step 4: Expand the step.

Step 5: Select the ‘JavaScript’ ID Method.

Step 6: The Java Script editor looks like,
This method does allow you to dynamically replace the text with a variable.
For example the evalXPath() statement looks like this:
- evalXPath("//a[text()=\"View My Notes\"]");
so you would expect you could do this:
- evalXPath("//a[text()=\"" + LR.getParam("Links") + ""\"]");
Unfortunately this does not work and will generate an,
- Error -203256: ** 17.3: Click on View My Notes ** failed - target object was not found.
- Reason: Exception occured in the JavaScript code: SyntaxError: illegal character [MsgId: MERR-203256]
Step 7: Extract the parameter to a JavaScript variable
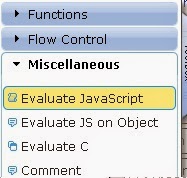
The solution is to add a new statement to the script. The Evaluate JavaScript statement can be added
from the Toolbox – Miscellaneous. This statement must be added prior to any statements that will use
the values. This statement will allow you to extract the value of the parameter and place it into a
JavaScript variable.

Step 8: Add the following in the editor as shown.

Script view will be,

Step 9: Surround with for loop and execute the script.

2.2.5 Selection of Drop Down values within a Range
If the drop down value selection should be done randomly, then follow the given steps.

Step 1: Record the selection step

Step 2: Expand the step, select the 2nd option and click ‘Back’

Step 3: Expand the step and add the code to the editor

Math.floor(Math.random() * 6) + 1
where,
- Math.random() - return a random number between 0 and 1
- Math.floor() - round a number downward to its nearest integer
- The whole syntax will generate a random number between 1 and 6
- The random() and floor() method is supported in all major browsers.
Step 4: Execute the script
2.2.6 Selecting a value using X-Path values

In yet another requirement of selecting a drop down value, we faced a small problem while selecting the item. After typing, mouse selection is only allowed and not using ‘tab’ or ‘enter’. It should be noted that although mouse click is used here, the script doesn't record the mouse related operations.
In such cases the ‘XPATH’ option was highly useful.
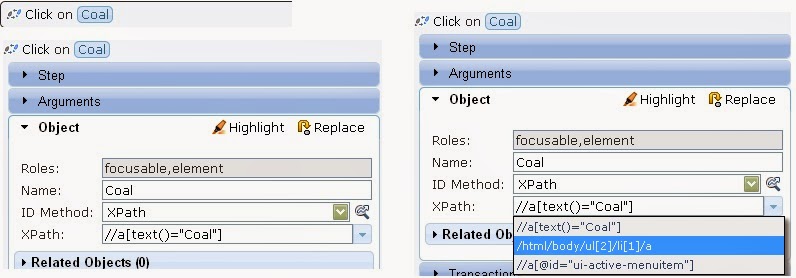
Where,
- /html/body/ul[2]/li[1]/a
- The
- tag defines unordered lists
- The
- tag defines a list item.
2.2.7 How to Select Last Value from a List
Assume that your drop down list is getting added for each iteration and you need to select the last value and proceed.
- Job Title
- Last Name
- Last Updated Date
- Preferred Name
- Reqion of Expertise
Step 1: Record the selection of drop down value from the above list

Step 2: Expand the step and select the 2nd option as shown below. Click ‘Back’ to set the option

Step 3: Expand the step and open JavaScript Arguments Editor

Step 4: Paste the below code

document.getElementById("attributeParam1").length
where,
- getElementById is the method which accesses the first element with the specified id.
- ‘attributeParam1’ is the ‘id’ value taken from the page source.
In order

In order to take the penultimate value just add ‘-1’ as shown.
- document.getElementById("attributeParam1").length-1
Step 5: Execute the script to see the results
2.3 External Functions Usage
2.3.1 Defining and Calling External C functions
Step 1: Add a function in ‘C-functions.c’ as shown.

Step 2: Drag and drop ‘Evaluate JavaScript’ from the toolbox.

Step 3: Add the following code in the editor as shown.

In this,
- LR.evalC - This calls the ‘getDate2’ function
- LR.getParam - Get the value from the ‘next’ parameter and save to a variable, fromDate
- LR.log - Log the messages to the ‘Replay Log’
2.3.2 Defining and Calling External Java function
Step 1: Add a function in ‘JS-functions.js’ as shown.

Step 2: Drag and drop ‘Evaluate JavaScript’ from the toolbox.
Step 3: Add the code as below and run the script

Output:

2.3.3 IO. Write Function
This function will write the string to an output file.

2.3.4 String Functions
In the below example, we will see how to extract a particular text from a string
Example 1: Using substring() function

If you want to extract a portion of the string from the application and to use for the subsequent
actions/steps, then make use of ‘substring’ function of JavaScript
The substring () method extracts the characters from a string, between two specified indices, and
returns the new sub string.
In my example, I have taken a hyperlink from which I want to separate characters and numeric s apart
Step 1: Record the step

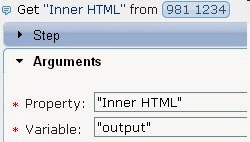
Step 2: Expand the step and select ‘Get Property’ of Action.

Step 3: Select the ‘Property’

Step 4: Supply the Property as ‘Inner HTML’ and variable name.

Step 4: Add ‘alert’ step to display the message during run time.

Step 5: Drag and drop ‘Evaluate JavaScript’ from the toolbox and use the sub-string function as shown.

Step 6: Run the script.

Example 2: Using parseInt() function

In the above screen shot, I want to separate ‘981’ from ‘-1234’
Step 1: Drag and drop Evaluate JS on Object’ from tool box and select the object from the application

Step 2: Change the ‘Evaluate JavaScript’ to ‘Get Property’
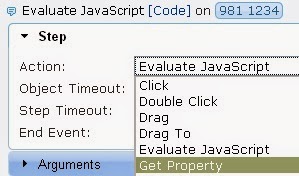
Step 3: Change the ‘Property’ to ‘Inner HTML’

Step 4: Keep the options as below
Step 5: Add the following code

Step 6: Execute the script to see the results.

2.3.5 How to display Output using C functions
Step 1: Add the following ‘test’ function in ‘C-functions.c’


Script would appear as,

Step 3: Add the function name.

Replay Log:

Complete Reference On Loadrunner Contact For Training - +91-8050148265: Ajax Trueclient Protocal Using Loadrunner >>>>> Download Now
ReplyDelete>>>>> Download Full
Complete Reference On Loadrunner Contact For Training - +91-8050148265: Ajax Trueclient Protocal Using Loadrunner >>>>> Download LINK
>>>>> Download Now
Complete Reference On Loadrunner Contact For Training - +91-8050148265: Ajax Trueclient Protocal Using Loadrunner >>>>> Download Full
>>>>> Download LINK R7