Friday 30 May 2014

Types of Logs in Load runner

Logs in runtime settings in Load runner


While creating and debugging the script which generated in LoadRunner always create various types of 

logs which appear in Virtual user generator screen. These logs are very useful when it’s come to
debugging your script.


There are four types of log available in LoadRunner:

  1. Recording Log
  2. Generation Log
  3. Replay Log
  4. Co-relations Results


1. Recording Log: This log is generated when user records any script. This log mainly contains client
server communication information which is nearly non-readable format. This is not very useful for us
since we cannot map many things of this log with our script. This log contains all protocol communication
information which used by application on which we are recording.

This Log is useful when we re-generate the script using “Regenerate Script” option of Vugen.
Recording log is traces created during the recording Vugen.

User cannot re-generate script if this log is not available.


2. Generation Log: The time user stop recording, recording log traces converts into readable format
and create a log which is known as “Generation Log”. This log is very useful to see request and response
captured by LoadRunner during recording. This log can be refer in script folder by accessing the file
“CodeGenerationLog.txt “


3.Replay Log:
 Now this is the log which helps us a lot while modifying the script. This log generated
when user replay the recorded script. In this log we can see what request has been sent to server and
which kind response we have received during replay. It’s become very handy when we need to find the
problem where script is getting fail during replay. We can increase/decrease the reply log contents by
changing the settings in “Run time setting” by selecting standard log or extended log section.

To view the complete error messages in the Analysis session of load runner

We can see the complete error messages in the analysis session.

 
Add "AdditionalGroupBy=Error Message" to ErrorsPerSecond.def and ErrorSummary.def

To display the complete error messages in the Analysis tool,follow the below steps:
1. Close Analysis
2. Go to "LoadRunner Install Dir"\bin\dat.
3. Open ErrorsPerSecond.def using a word editor (notepad/wordpad).
4. Edit the section for "Graph Definitions."
5. Add an "Error Message" value to the AdditionalGroupBy key.

Example:
               [Graph Definitions]
                 AdditionalGroupBy=Error Message

6. Repeat Steps 5 and 6 for ErrorSummary.def.
7. Reload the raw analysis session and Add Error Statistics graph.
8. After the 'Error Statistics' graph is added, right click on the graph and select ' Set Filter/Group By'
     option.
9.On the Lower pane where it says, 'Group By' select 'Error Message' and it should be available in the
    'Available Group'
10.On the upper pane where it says 'Filter Condition', under 'Error Message' or 'Error Type' select all
      or any of the error codes or message to be shown on the graph.
      This will show the error messages along with the code on the lower half pane where the graph is
      displayed and it will exported in any reports that are created.

To display the Number of Vusers in Scenario

Steps to display the total number of Vusers in the scenario instead of just the running Vusers

If you want to display the total number of Vusers in the scenario instead of just the running Vusers

There are two files that need modifications.

1. Open VuserStateGraph.def located under \bin\dat.
  •      Search for the [AdditionalFilter0] section.
  •      Change Values=Run to Values=Quit.
  •      Save the file.
2. Open AnalysisSummary.asc located under \bin\dat.

a. Change FieldName=Maximum Running Vusers: toFieldName=Total Running Vusers:.
     Save the file.

3. Open up the results file (.lrr) again, it will now display the Total Running Vusers as opposed to        
     Maximum Running Vusers.

Issue in replay due to Redirection

This summary is not available. Please click here to view the post.

Process to run Vuser scripts in Stand-Alone Mode in LR

Running Vuser Scripts in Stand-Alone Mode:


In order to perform load testing with a Vuser script, you need to incorporate the script into a LoadRunner
scenario. Before integrating the script into a scenario, you should check its functionality by running the
script in stand-alone mode.

Stand-alone mode:
Running a script in stand-alone mode means running the script without using a LoadRunner Controller.
This is done to establish how the script will execute when run from the Controller. If the script is
Windows-based, you use VuGen to run it in stand-alone mode. If the script is UNIX-based, you must
run it from a UNIX command line.

If the stand-alone execution is successful, then incorporate the script into a scenario.

JVM garbage collection in young generation


    Allocating new objects using new operator (almost) always happens in Eden space. But Eden is actually
a stack. When you create new object needing N bytes, single pointer advances by N bytes on that stack and
that's it. Allocating is that fast, no searching for free spot, compacting, whatever.

  Offcourse this stack is not infinite, at some point we'll reach its end, triggering minor GC. Also most likely
multiple objects are already garbage. So what JVM does in minor GC is the following:


  • Traverse graph of objects starting from GC roots.
  • Copy all objects reachable from GC roots to one of survivor spaces (no gaps, we know all of them
    and this 
    is a single process)

  •  Wipe out eden space (basically just moving this stack pointer back to 0)

In subsequent minor collections there are additional steps:

one of survivor spaces is examined as well. Live objects from both eden and one of survivor spaces are
copied to second survivor space. This means there is always exactly one free survivor space.

So how are objects ending in tenured generation?

  1. First young objects are copied to one of survivor spaces. 
  2. Then they are copied to the other and again and again. Once given object jumps back and forth
    too many 
    times (configurable, 8 by default), it is promoted to tenured space.
  3. Major GC runs when tenured space is full.

Error: Extension lrcVba was not loaded.

 You are running under secure mode and this extension is not allowed-Error in loading Extension or DLLs while running LG over firewall

When running COM/DCOM scripts either from standalone Controller or from Performance
Center, they fail with 

"Error: Extenstion lrcVba was not loaded. You are running under secure mode and this
extension is not allowed"
The same issue can happen for VB and JAVA user scripts.

To solve this follow these steps:

To be able to run the COM/DCOM scripts on an InjectorOverFireWall machine, or any other
protocol type which is not allowed to run over the firewall by default, do the following:
1. Open the *.usr file, located in the script directory, using notepad and find the value for
    Type=.
2. On the LG machine, go to (pc install dir)\dat\mdrv\lrc_mdrv.dat file and open it in
    notepad.
3. Add the flag "SecurityMode=on" under the relevant section like [lrc], [lrcVba],
    [lrcCreplay], [lrcVbareplay] etc..,
4. Save the changes and restart the agent process or service on the LG machine.
5. Run the test again.It work will fine.

Thursday 29 May 2014

The controller could not initialize successfully. Error code: 5.

If running under TErminal Sessions make sure the "Create global objects" privilege is assigned to the user account. error in Load runner

some times opening the controller on remote machine or shared machine we may get the following error.

"The controller could not initialize successfully. Error code: 5. If running under
TErminal Sessions make sure the "Create global objects" privilege is assigned to the
user account."


This is because  when multiple users access controller at the same moment. then only we will get this error.
Logoff the other users and restart the Server (optional) and try again it works

Vusers are not exiting after force stop,scenario is not finishing on time in Load runner

    When ever you run a scenario and that is for set of Hrs and set of  mins, and you may observe that your 

VUsers are not dropping after this time, or they seem to be stalled in gradual exiting state,the reasons
behind this are:
1Think Time: If your scripts are having exceedingly large think times, and your run time settings allow
a 50 to 150% of recorded think time, these scripts will continue to execute till they have a controlled exit
even after the stipulated schedule.so this may be a cause


2Pacing : Your 
Transactions Per Second is what your pacing is. If your scripts have reached an
execution state just before the end of the run, these executions will continue to run till they have a
controlled exit. You might want to adjust the pacing accordingly to achieve exact Transactions Per
Second  you are looking for.
.so this may be a cause.

3Load generators : Check the health of your load generators. If your load generators are fighting for
resources, this may cause unforeseen consequences on your schedule.
.so this may be a cause

      If you are only looking out for the constant 1 hr run and ignore ramp up and ramp down schemes, you
may with out any problem force stop the users. But, in case of tests where you want to look out for the
resource handling, ramp down is a very important step and you may not want to force stop these users.

Error -26000, Error -26377 in load runner

      Error -26377:  No match found for the requested parameter “VS01″. Check whether the requested boundaries exist in the response data. Also, if the data you want to save exceeds 1024 bytes, use web_set_max_html_param_len to increase the parameter size [MsgId: MERR-26377]


The general practice is to add a global setting at the start of the script like this –

web_set_max_param_len("99999");

While this sets up the buffer size to 999999 bytes – large enough to hold up your data, this poses serious
problems that you won’t realize until it happens during a load test.


The mdrv.exe is a driver process which is responsible for running Vusers on your load generator. Even
after LR11.xx, this process continues to be 32 bit one. So the maximum addressable space is 4GB by
this process.


Running VUsers as thread has an advantage of sharing this 4 GB of space between a lot of threads. With
the increase in number of users, you can see the instances of mdrv.exe increasing on your load generator
to accommodate the users.


Each VUser takes up certain amount of space in your RAM depending on the code, context/context-less
recording, custom variables + the amount of buffer before executing the request following a
web_reg_save_param. The unused space from this buffer will be available for other threads of the
process once the correlation is done.


At the precise point of assigning a certain buffer space to the requested parameter, if you happen to have
a large number of VUsers demanding the same line of code execution, you will simply run out of memory
and the user fails. You will see the following error in the VUser log and error message window:


Error -26000: Error: Out of memory ! [MsgId: MERR-26000]

The following screen shot is taken for a mock test which had a script with a high value for
web_set_max_html_param_len and run with 100 users on a load generator

Dynamic transaction names in Vugen scripting using load runner

       Most of the  times, we would like to see the performance a table fetch. Most of the times, when we work on applications that uses various filter conditions, we cannot incorporate all the filter conditions in a single script and infact, that is far from business need too. What we do in these conditions is, parameterize the search criteria and run the scenario. It would be very helpful if we can name this particular transaction with the filter condition that was applied for a particular iteration.


Solution:
Here we need to have a prefix transaction name first. For example, if I am searching for a document
with a different set of properties every time, like – approved, withdrawn, submitted etc., its better I
have a prefix transaction name like “T01_SearchDocWithStatus_” and then append to it the
parameterized value chosen.


char transactionName[100];

char* temp[50];

strcpy(temp,” T01_SearchDocWithStatus_”);

strcat(temp,lr_eval_string(“{DocStatus}”));

strcpy(transactionName,temp);

lr_start_transaction(transactionName);

web_url{


This way, when you run the scenario, you can look at the response times of individual status fetches

Note: That you cannot declare the transactionName as a pointer variable.

NFR for Performance Testing in LoadRunner

Non Functional Requirement (NFR) 

The most important points to consider when writing an NFR are:

1. Qualified – It should describe in words what is required. This is important, spreadsheets with boxes
that have numbers in them are only useful if everyone agrees on the same assumptions – this is rarely
the case as a box with 1 second in it can mean a lot of things to a lot of people.

2. Defined – For example, a response can be measured at various points, there are lots of layers that a
request can pass through and the very last point in the stack is when it hits the user’s eyeball. It is
important to define which layer we are working in. Typically, in load testing you want to remove the
client and the network and only focus on server response times (different people have different bandwidths
and different PCs so we remove those variables).

3. Quantified – We need actual numbers to work to. The best number to use is the 90th percentile as this
prevent the minority skewing the majority.

4. Flexibility – NFRs are not written in stone and can be changed. But we must have a line in the sand to
start with. This line can be, and usually is, moved but having it defined prevents either needless tuning or,
worse, insufficient tuning.

5. Volumetrics – Now that we know how fast we want the system to respond we have to decide under
what conditions we want it to do this. This is known as defining the ‘load’ to be tested to and is most often
expressed in terms of business requests per second/minute. For end to end performance testing it should
be complete and describe traffic from all sources. For component testing it should set the scope for what
is to be tested. If the system is complicated then this data can be defined in a separate document and
referenced.

An example:
“As a business owner, I want 85% of Login requests to be served within 650ms, 95% within 850ms and
none over 1200ms where a response is defined as a HTTP 200 return code from the server to Apache and
does not include any client side or external network (internet) processing. Requests must be made against
a fully populated database that is a replica of Production and this level of performance should be
maintained for 1 hour without degradation during a simulation of the peak load as defined in the ‘Project
Volumetrics’ document which includes 2.6 Login requests per second via 220 concurrent threads.”

Issue in AJAX True Client protocol

“communication between vugen and the truclient browser could not be established” Issue in Ajax TruClient

Some time while clicking the ‘Develop Script’ button we may get the following error.
"Communication between VuGen and the TruClient browser could not be established. This error
occurred because you do not have proper permissions".


Solution is

  • Run VuGen as a administrator. Right click on VuGen icon-> Run as administrator.
  • Check installation requirements for LoadRunner regarding versions of browsers, etc... along with the
    expressed access rights required on your PC. A solid 90%++ of recording issues are resolved by
    examination of the installation requirements and reconciling your installation settings to the items
    noted as requirements for the installation and use of the software.
  • The Firefox version delivered in Load Runner 11.5 is 8.01.Try to uninstall the product, re-install and
    install also service pack 1 on top of the GA.

Wednesday 28 May 2014

JVM Heap Memory

EdenSpace,Survivor Space,Young Generation,Java Heap Area,Virtual Space,PermGenSpace,Native Area in JVM....


Eden Space:


Eden Space is a Part of Java Heap where the JVM initially creates any objects, where most objects die and
quickly are cleaned up by the minor Garbage Collectors (Note: Full Garbage Collection is different from
Minor Garbage Collection). Usually any new objects created inside a Java Method go into Eden space and
the objects space is reclaimed once the method execution completes. Where as the Instance Variables of a
Class usually lives longer until the Object based on that class gets destroyed. When Eden fills up it causes a
minor collection, in which some surviving objects are moved to an older generation.

Survivor Spaces:

Eden Sapce has two Survivor spaces. One survivor space is empty at any given time. These Survivor
Spaces serves as the destination of the next copying collection of any living objects in eden and the other
survivor space.
The parameter SurvivorRatio can be used to tune the size of the survivor spaces.
-XX:SurvivorRatio=6 sets the ratio between each survivor space and eden to be 1:6
If survivor spaces are too small copying collection overflows directly into the tenured generation.

Young Generation: (-XX:MaxNewSize)

Till JDK1.3 and 1.4 we used to set the Young Generation Size using -XX:MaxNewSize. But from JDK1.4
onwards we set the YoungGeneration size using (-Xmn) JVM option.
Young Generation size is controlled by NewRatio. It means setting -XX:NewRatio=3 means that the ratio
between the Old Generation and the Young Generation is 1:3
.
Similarly -XX:NewRatio=8 means that 8:1 ratio of tenured and young generation.
NewRatio: NewRatio is actually the ratio between the (YoungGenaration/Old Generations) has default
values of 2 on Sparc , 12 on client Intel, and 8 everywhere else.
NOTE: After JDK 1.4 The Young Generation Size can be set using (-Xmn) as well.

Virtual Space-1: (MaxNewSize – NewSize)

The First Virtual Space is actually shows the difference between the -XX:NewSize and -XX:MaxNewSize.
Or we can say that it is basically a difference between the Initial Young Size and the Maximum Young Size.

Java Heap Area: (-Xmx and -Xms)

Java Heap is a Memory area inside the Java Process which holds the java objects. Java Heap is a
combination of Young Generation Heap and Old Generation Heap. We can set the Initial Java Heap
Size using -Xms JVM parameter similarly if we want to set the Maximum Heap Size then we can use
-Xmx JVM parameter o define it.

Example:
-Xmx1024m —> Means Setting the Maximum limit of Heap as 1 GB
-Xms512m —> Means setting Java Heap Initial Size as 512m

NOTE: It is always recommended to set the Initial and the Maximum Heap size values as same for better
performance.

NOTE: The Theoretical limitation of Maximum Heap size for a 32 bit JVM is upto 4GB. Because of the
Memory Fragmentation, Kernel Space Addressing, Swap memory usages and the Virtual Machine
Overheads are some factors JVM does not allow us to allocate whole 4GB memory for Heap in a 32 bit
JVM. So usually on 32-bit Windows Operating Systems the Maximum can be from 1.4 GB to 1.6 GB.
.
If we want a Larger memory allocation according to our application requirement then we must choose the
64-bit operating systems with 64 bit JVM. 64-bit JVM provides us a larger address space. So we can have
much larger Java Heap with the increased number of Threads allocation area. Based on the Nature of your
Operating system in a 64 bit JVM you can even set the Maximum Heap size upto 32GB.

Example: -Xms32g -Xmx32g -Xmn4g

Virtual Space-2: (MaxHeapSize – InitialHeapSize)

The Second Virtual Space is actually the Difference between the Maximum Heap size (-Xmx)and the
Initial Heap Size(-Xms). This is called as virtual space because initially the JVM will allocate the Initial
Heap Size and then according to the requirement the Heap size can grow till the MaxHeapSize.

PermGen Space: (-XX:MaxPermSize)

PermGen is a non-heap memory area where the Class Loading happens and the JVM allocates spaces for
classes, class meta data, java methods and the reference Objects here. The PermGen is independent from
the Heap Area. It can be resized according to the requirement using -XX:MaxPermSize and -XX:PermSize
JVM Options. The Garbage collection happens in this area of JVM Memory as well. The Garbage collection
in this area is called as “Class GC”. We can disable the Class Garbage Collection using the JVM Option
-noclassgc. if ”-noclassgc” Java Option is added while starting the Server. In that case the Classes instances
which are not required will not be Garbage collected.

Native Area:

Native Memory is an area which is usually used by the JVM for it’s internal operations and to execute the
JNI codes. The JVM Uses Native Memory for Code Optimization and for loading the classes and libraries
along with the intermediate code generation.

The Size of the Native Memory depends on the Architecture of the Operating System and the amount of
memory which is already commited to the Java Heap. Native memory is an Process Area where the JNI
codes gets loaded or JVM Libraries gets loaded or the native Performance packs and the Proxy Modules
gets loaded.

There is no JVM Option available to size the Native Area. but we can calculate it approximately using the
following formula:

NativeMemory = (ProcessSize – MaxHeapSize – MaxPermSize)

Tuesday 27 May 2014

Java (Java Virtual Memory) Memory Types

JVM memory area related jargons are key to understand the JVM on the whole. In this article let us discuss about the important memory areas in JVM.


Memory Types :

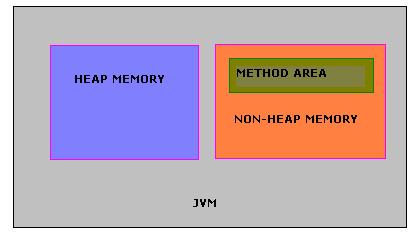
Heap Memory:
     
Class instances and arrays are stored in heap memory. Heap memory is also called as shared memory.
As this is the place where multiple threads will share the same data.

Non-heap Memory:
   
   It comprises of ‘Method Area’ and other memory required for internal processing. So here the major
player is ‘Method Area’.


Method Area:
     
As given in the last line, method area is part of non-heap memory. It stores per-class structures, code
for methods and constructors. Per-class structure means runtime constants and static fields.

Memory Pool:

       Memory pools are created by JVM memory managers during runtime. Memory pool may belong to
either heap or non-heap memory.

Runtime Constant Pool:
         A run time constant pool is a per-class or per-interface run time representation of the constant_pool
table in a class file. Each runtime constant pool is allocated from the Java 
virtual machine’s method area.


Java Stacks or Frames:
       Java stacks are created private to a thread. Every thread will have a program counter (PC) and a java
stack. PC will use the java stack to store the intermediate values, dynamic linking, return values for
methods
and dispatch exceptions. This is used in the place of registers.

Memory Generations

          HotSpot VM’s garbage collector uses generational garbage collection. It separates the JVM’s memory
into and they are called young generation and old generation.

Young Generation
         Young generation memory consists of two parts, Eden space and survivor space. Shortlived objects
will be available in Eden space. Every object starts its life from Eden space. When GC happens, if an object
is still alive and it will be moved to survivor space and other dereferenced objects will be removed.

Old Generation – Tenured and PermGen
         Old generation memory has two parts, tenured generation and permanent generation (PermGen).
PermGen is a popular term. We used to error like PermGen space not sufficient.

          GC moves live objects from survivor space to tenured generation. The permanent generation
contains meta data of the virtual machine, class and method objects.

Discussion:
         Java specification doesn’t give hard and fast rules about the design of JVM heap data area. So it is left
 to
the JVM implementers and they can decide on things like whether to allocate fixed memory size or
dynamic.

Key Takeaways
  • Local Variables are stored in Frames during runtime.
  • Static Variables are stored in Method Area.
  • Arrays are stored in heap memory.

Creating Dynamic itemdata in Web_submit_data in load runner

  If there is a scenario of searching for a course by its first name or wild cards. The search returns different number of results for different queries. This request is followed by another web_submit_data where the ITEMDATA depends on number of search results.


There are three dynamic variables here – length of the course variable, results returned and the third one
being the ITEMDATA of the request itself.

The solution is to build dynamic data on the fly and create a web_custom_request for the
web_submit_data


The following function will build the item data -

const char* BuildItemData(int pageSize,const char*ItemDataStart,const char*ItemDataEnd, int
lengthOfCourseVar, const char* ArrayName)
{

char* ItemData;

int iCount,lengthOfOneItem;

lengthOfOneItem = lengthOfCourseVar+strlen(ItemDataStart)+strlen(ItemDataEnd);

ItemData = (char*)malloc((pageSize*(lengthOfOneItem))*sizeof(char));

ItemData[0]=”;

for(iCount=1;iCount<=(pageSize);iCount++)

{

strcat(ItemData,ItemDataStart);

strcat(ItemData,lr_paramarr_idx(ArrayName,iCount));

strcat(ItemData,ItemDataEnd);

}

return ItemData;

}

I changed the web_submit_data to web_custom_request and used the string output as a parameter
like
this:

lr_save_string( BuildItemData(lr_paramarr_len(“cor_Arr_ClassIDs”),”offId[]=class”,”&”,
strlen(lr_paramarr_idx(“cor_Arr_ClassIDs”,1)),”cor_Arr_ClassIDs”),“ItemDataOnTheFly” );


web_custom_request(“xxxxxxx.aspx”,

“URL=https://{par_Environment_URL}/xxxxxx/xxxxxx.aspx”,

“Method=POST”,

“TargetFrame=”,

“Resource=0″,

“RecContentType=text/html”,

“Referer=https://{par_Environment_URL}/xxx/xxx/xxx/xxxx/xx/xxxxxx?xxxxxx={par_Location}”,

“Snapshot=t12.inf”,

“Mode=HTML”,

“EncType=application/x-www-form-urlencoded; charset=utf-8″,

“Body={ItemDataOnTheFly}&lrnid=xxxxx/{par_UserID}”,

LAST);

Security Testing

          Security testing is related to the security of data and the functionality of the application. You should be aware of the following concepts while performing security testing:


1. Confidentiality - The application should only provide the data to the relevant party .

     For Example : one customer's transaction data should not be visible to another customer, the
irrelevant personal details of the customer should not be visible to the administrator and so on.

2. Integrity - The data stored and displayed by the application should be correct.

    For Example :
After a withdrawal,the customer's account should be debited by the correct amount.

3. Authentication - It should be possible to attribute the data transmitted in the application to either
the application or the customer. In other words, no one other than the customer or the bank should be
able to create or modify any data.

4. Authorization - The application or a user should only be able to perform the tasks which they are
respectively authorized to perform.

        For Example : A customer should not be able to withdraw more than the balance in their account
without having an overdraft facility, the application should not be able to levy charges on a customer
account without prior customer approval.
5. Availability - The data and functionality should be available to the users throughout the working
period

        For Example :
If the bank's operating times are from 8 a.m. to 8 p.m. on all working days, it
should be possible for a customer to access their account and make the necessary transactions on their
account.

6. Non-repudiation - At a later date, it should not be possible for a party to deny that a particular
transaction or data change took place.

For Example : If a customer withdraws an amount from their account, this should trigger the relevant
actions (posting to their transaction records, debiting their account and sending them a notification etc.).

To avoid any data breach by hackers. You should understand that hackers are not the only people from
whom the application functionality and data need to be protected. There are other people that you need
to consider as well:


1. Disgruntled customers
2. Unhappy or malicious employees of the bank
3. Unprofessional service providers e.g. an unprofessional hosting company that may have access to the
     application and the data
4. Unprofessional auditors


Further, since financial data is so important, banking applications in certain countries have to be
compliant he relevant financial standards. Research the relevant standards that your application needs
to follow.
Creating a secure application involves a lot of work in designing a secure application and
designing a secure 
data store. Even after deployment, the application should be closely monitored to
ensure that the data is being 
accessed by only the authorized people. If any security breach is reported,
it should be analyzed carefully and 
the loopholes plugged.

Now, let us discuss the actual security testing. You should design security tests based on at least the
following:

1. Stated security requirements
2. Security-related standards that the application should follow Assuming that it is a web application,
3. Common vulnerabilities found in web applications
4. Different browser versions on different operating systems (here you should note that implementing
security only on the client-side may not suffice)

In your initial tests, you may want to use automated testing tools.

     e.g.
web vulnerability scanners, password crackers, web proxy tools etc. Based on your learning, you
may want to execute the more complex security tests by hand. Keep yourself updated about the latest
hacks and test them on your application before every release.

Monday 26 May 2014

Disabling and Enabling Rendezvous Points in Load runner

Rendezvous Points:

 
         During a scenario run, you can instruct multiple Vusers to perform tasks
simultaneously by using rendezvous points. A rendezvous point creates intense user
load on the server and enables LoadRunner to measure server performance under
load. arrives at the rendezvous point, it is held there by the Controller. You then set a
rendezvous policy according to which the Controller releases the Vusers from the
rendezvous point either when the required number of Vusers arrives, or when a
specified amount of time has passed. You define rendezvous points in the Vuser
script.

A. Using the Controller, you can influence the level of server load by selecting:

  •  Which of the rendezvous points will be active during the scenario?
  • How many Vusers will take part in each rendezvous?

B. Include lr_rendezvous(“rendezvous_name”); on the top of the start transaction
where the rendezvous of all the Vusers must occur in the VuGen script.

C. Howto Set Up a Rendezvous in a Scenario?

Prerequisites:

To set up a rendezvous in the scenario, your scenario must include Vuser scripts that
have rendezvous points inserted in them. When you add a Vuser group or script to
the scenario, LoadRunner scans the included scripts for the names of the rendezvous
points and adds them to the list of rendezvous points. You can see the list of all the
rendezvous points in your scenario by selecting Scenario > Rendezvous.

Note: In goal-oriented scenarios, a script’s rendezvous points are disabled.

Set the level of emulated user load


Select the rendezvous points to take part in the scenario, and the number of Vusers
to participate in each rendezvous. You can temporarily disable a rendezvous and
exclude it from the scenario. You can disable a rendezvous point for all Vusers in a
scenario, or you can temporarily disable specific Vusers from participating in the
rendezvous. By disabling and enabling a rendezvous, you influence the level of server
load.

Set the attributes for the rendezvous policy – Optional


In the Rendezvous Information dialog box, for each rendezvous:

a. Select the rendezvous, and click the Policy button.
b. In the Policy dialog box, set the policy attributes as follows:
  •  Release. How many Vusers will be released from a rendezvous at a time.
  •  Timeout. How long the Controller waits before releasing Vusers from a rendezvous

By disabling and enabling rendezvous points, you can influence the level of server load.

Disabling a rendezvous temporarily removes it from the rendezvous list and excludes it from the scenario.

Enabling a rendezvous returns it to the Rendezvous list and includes it in the scenario.

You use the Disable and Enable commands to change the status of rendezvous points during a scenario.

To disable a rendezvous: 


1. Open the Rendezvous window. The Rendezvous menu appears in the LoadRunner menu bar.

2. Click a rendezvous. The selected rendezvous is highlighted.

3. Choose Rendezvous > Disable, or click the Disable button. The rendezvous name changes from black to
gray and the rendezvous is disabled.

To enable a rendezvous: 

1. Open the Rendezvous window. The Rendezvous menu appears in the LoadRunner menu bar.

2. Click a disabled rendezvous. The selected rendezvous is highlighted.

3. Choose Rendezvous > Enable, or click the Enable button. The rendezvous name changes from gray to
black and the rendezvous is enabled.

Prerequisites for load Testing in LoadRunner

   Important Set up before load testing includes:


A suitable time to load-test the application, for instance when no development work is taking place on
the Server (load testing may cause the server to crash) and/or no other users are accessing the server
(else the testing results would not yield the correct measures)

  1.  The performance metrics, accepted levels, or SLAs and goals
  2.  Objectives of the test
  3.  The Internet protocol(s) the application is(are) using (HTTPS, HTTP, FTP, etc.)
  4. If your application has a state, the method used to manage it (URL rewriting, cookies, etc.)
  5.  The workload at normal time and at peak time
  6. Before load or performance testing application should be stable at least tested at once through
    the manual method.
  7. Before load testing, do not record any page, which has 404 or server errors
  8. During load test don’t do real transaction or any money ready work.
  9.  During load testing try to maintain the real scenario as user experience
  10.  Use meaningful test scenarios (use cases are helpful) to construct test plans with 'real-life' test
    cases.
  11.  Make sure that the machine running Load testing tool has sufficient network bandwidth, so the
    network connection has little to no impact on the results.
  12. Let Load Test run for long time periods, hours or days, or for a large number of iterations. This
    may yield a smaller standard deviation, giving better average results. In addition, this practice
    may test system availability rate and may highlight any decay in server performance.
  13.  Ensure that the application is stable and optimized for one user before testing it for concurrent
    users.
  14.  Incorporate 'thinking time' or delays using Timers in your Load testing scenario Test Plan. 
  15.  Keep a close watch on the four main things: processor, memory, disk, and network.
  16.  Only run Load testing tool against servers that you are assigned to test, else you may be accused
    of causing DoS attacks.

Steps to Enable Remote Desktop Connection from Remote Registry

Machine A : PC which you are using to active remote desktop connection in another PC


Machine B : PC for which remote desktop connection has to be activated.

Step 1: From Machine A : Goto Start -> Run -> regedit. Open the Registry window of Machine A.

(Note: User ID logged in Machine A should have ADMIN rights in Machine B)

Step 2: Click “Connect Network Registry“

Step 3:Enter the computer name of Machine B, for which we have to change the settings and Click “OK”

Step 4: The destination machine (Machine B) will be connected with our current logged in machine
(Machine A).
Step 5:Goto the below mentioned path and change the fDenyTSConnections to “0” and click “OK”.

HKEY_LOCAL_MACHINE\SYSTEM\CurrentControlSet\Control\Terminal Server

HKEY_LOCAL_MACHINE\SOFTWARE\Policies\Microsoft\Windows NT\Terminal Services

Step 6:After doing the following changes, right-click the remote machine (Machine B) name and click
Disconnect.
NOTE: If suppose the above mentioned registry value is not found, then create a DWORD parameter
with a value ’0′.

Little's Law and Steps to calculate

 Little's Law:


Little's law is quite simple and intuitively appealing.

The law states that the average number of customers in a system (over some time interval), N, is equal to
their average arrival rate, X, multiplied by their average time in the system, R.

N = X . R (or) for easy remembrance use L = A . W

This law is very important to check whether the load testing tool is not a bottleneck.

For Example, in a shop , if there are always 2 customers available at the counter queue , wherein the
customers are entering the shop at the rate of 4 per second , then time taken for the customers to leave
from the shop can be calculated as

N = X. R
R = 2/4 = 0.5 seconds


A Simple example of how to use this law to know how many virtual users licenses are required:

Web system that has peak user load per hour = 2000 users
Expected Response time per transaction = 4 seconds
The peak page hits/sec = 80 hits/sec

For carrying out Performance tests for the above web system, we need to calculate how many number of
Virtual user licenses we need to purchase.

N = X . R
N = 80 . 4 = 320

Therefore 320 virtual user licenses are enough to carry out the Load Test.

Reasons for Events are not Recorded in LR Scripting

Here are the most common reasons why no events are showing in the script:


The events counter keeps increasing, while the generated script is empty

This may be because VuGen’s recording mechanism fails to identify HTTP data. To fix it, ensure that
your application indeed uses HTTP Web traffic. If the application uses SSL connections, make sure
you choose the correct SSL version (SSL 2, SSL 3, TLS) through the Port Mapping dialog, available by
clicking the ‘Options…’ button on the Record > Recording Options… dialog:


The Advanced Port Mapping Settings dialog opens when you click ‘Options…’:


The events counter shows less than five events, while the application keeps getting data from the server

In this case, VuGen’s recording mechanism fails to capture any network activity at all. Ensure that your
application really does provide some network traffic, ie. it sends and receives data through the IP network.
If an antivirus program is running, turn it off during recording. Check the recording log for any clues about
the recording failure. Messages such as “connection failure” or “connection not trapped” can be a sign of
the wrongly configured Port Mapping settings.

In addition, if you are recording on a Chrome or Firefox browser, make sure that all the instances of the
browser are closed prior to the recording.

Causes for the Recorded application becomes Unresponsive during the Recording

      This could be caused by VuGen’s recording mechanism not being able to connect to the application’s server. Network connection errors can be seen in the Recording Log:


[Net An. Warning (1068:197c)] Request Connection: Remote Server @ 123.123.123.123 - 5222 (Service
=)Failed attempt #1.

Unable to connect to remote server: rc = -1 , le = 10060) [Net An. Warning (1068:197c)]

Request Connection: Remote Server @ 123.123.123.123 - 5222 (Service=) Failed attempt #2. Unable to
connect to remote server: rc = -1 , le = 10060)

Note: The Recording log is in the ‘Output’ pane. Make sure ‘Recording’ is selected in the combo-box on
the left:


In order to fix this problem, the Port mapping for the specific IP and port should be added to the Port
Mapping dialog (under the Record > Recording Options… menu), and the entry should be unchecked.
That will ensure that the above IP and port are not recorded – that application simply connects to them
without any LoadRunner involvement.

For the messages above the correct setting would be:


       This workaround can be done in case the communication to 123.123.123.123:5222 is not important for
 the business process and can be omitted. If that’s not the case, the same entry should still be added, but
left  
as checked.That will ensure correct traffic capture to this address.

Creating a custom .DLL file in LoadRunner

      Sometimes LoadRunner does not provide all the needed features that one needs when doing performance testing. One option is to write DLL’s to handle the needed stuff and writing your own custom DLL’s is really easy once you get the hang of it!


I needed to do a few HTTP calls “under the radar” from a script so using Delphi 2009 I wrote my own
HTTPClient DLL that allows me to do a HTTP GET to a specific URL without adding to the statistics
(Pages and Hits/Sec stats).


Creating DLL’s in Delphi is really simple. One of the things I had to keep in mind was that D2009 uses
unicode internally so I had to take care to convert any internal strings to non-unicode before returning
them to LR. I opted for using the Indy 10 component TIdHTTP as the base HTTP client, adding some
Cookie handling and Compression support (gzip,deflate) and making sure the DLL was thread safe (as
many client threads/process would be using it). I also soon realized I needed HTTP Proxy Support so
in the end I added that too.


Finally had a DLL that exported the following methods:
http_Initialize( VUserID: Integer )
http_WebProxy( VUser: Integer; Host:PAnsiChar; Port: Integer )
http_WebGet( VUserID: Integer; URL: PAnsiChar; DestBuf: PAnsiChar; BufSize: Integer )
http_Finalize( VUserID: Integer )

The VUserID is the identifier for the connection since the DLL supports keep-alive. Calling Finalize() will
destroy all cookies and disconnect the client from the server.


 Sample script:

vuser_init()
{
int ret, VUserID;
char buf[10240];

// Get VUserID
VUserID = atoi(lr_eval_string("{VUserID"));

// Load the DLL
lr_load_dll("HTTPClient.dll");

// Initialize the VUser object inside the DLL
http_Initialize( VUserID );

// Set the HTTP Proxy
http_WebProxy( VUserID, "127.0.0.1", 8080);

// Clear buffer, and get the URL's response
memset(buf,0,sizeof(buf));
ret = http_WebGet( VUserID, "http://www.google.com", buf, sizeof(buf) );

// Check for error
// Returns
// 0 != Insufficient Buffer (Returned value is needed size)
if (ret != 0) lr_error_message("Error: RetCode=%d", ret)
else lr_output_message("%s", buf);

// Finalize the VUser (free the VUser object inside the DLL)
http_Finalize( VUserID );

return 0;
}


An additional good thing with this is that the DLL can be loaded under ANY protocol, so now HTTP calls
can be made in any script type!